Thursday, December 2, 2021

FRIENDSHIP BREAD


Friendship Bread

The following instructions are for making a wonderful bread from the bag starter dough given to you by a friend.  It is important you follow the schedule.  The day the dough is separated is day ONE 

Do not refrigerate leave at room temperature.

_______________ Day 1    do nothing (let air out slightly if bag is about to pop)

_______________ Day 2    mush bag 1-2 times (let air out slightly if bag is about to pop)

_______________ Day 3    mush bag 1-2 times (let air out slightly if bag is about to pop)

_______________ Day 4    mush bag 1-2 times (let air out slightly if bag is about to pop)

_______________ Day 5    mush bag 1-2 times (let air out slightly if bag is about to pop)

_______________ Day 6    Add directly into your bag 1 cup of  FLOUR, MILK, AND SUGAR

_______________ Day 7    Mush bag and let out air 2 times a day

_______________ Day 8    Mush bag and let out air 2 times a day

_______________ Day 9    Mush bag and let out air 2 times a day

_______________ Day 10 Add directly into your bag 1 cup each of  FLOUR, MILK, AND SUGAR

                                                                                                                                         (batter will be lumpy)

Pour batter from your bag into a large plastic or glass bowl.  Using a plastic/glass measuring cup, fill 4 individual gallon ziplock baggies, with 1 cup of batter each.  Seal these bags and set aside.  You should have approximately 1 cup of batter (or less) left in your bowl.  Add the following ingredients in your bowl:

1 cup of oil (vegetable is best)           ½ cup of whole milk

3 eggs                                                                  1 tsp. vanilla

__________________________________________________________________________________________________________________

Mix together with a wooden or plastic spoon and add to the above mixture:

2 cups flour                                                     1½ teaspoon baking powder

½ tsp. salt                                                        1 cup sugar

1 tsp. baking soda

1 large box of instant pudding (chocolate, banana, vanilla, butterscotch)

You can add 1 cup of nuts chopped, coconut, chocolate chips, crushed peppermint etc.

Mix well.  Grease 2 large loaf pans, 24 muffin tins, Bundt pan or mini loaf pans. 


I use chocolate pudding and chocolate chips with nuts, just be creative and have fun .....

LOAF PANS (LARGE)     325°     For a good hour

MUFFIN TINS     325°     For 30 minutes

Remember you can freeze the starters and when you defrost  It is day 1 or use them to bake.

You can give a starter bag as a gift with these instructions to carry on a tradition!


If you don't have a starter anymore you can make another one with the recipe below:

Ingredients

¼ cup of water (approx. 110°)                           1 package of dry yeast (2¼ tsp.)

1 cup all-purpose flour                                           1 cup granulated sugar

1 cup whole milk

Mix together in a ziplock bag and start counting as day 1. Follow directions from the beginning of this recipe.

Enjoy and make everybody's taste buds happy!


SueR 2021


Wednesday, February 12, 2014

Valentines day Fun


I have been having fun crafting for Valentines day. This idea started out as a vinyl design and morphed into an Easel Card! The card is so sparkly in person!
The Glass block really lights up with the battery operated lights I put in it.
The Chevron Love design is an Anniversary Card for two of my oldest friends who were married on Valentines day! Blogger is driving me crazy!
Here is the LINK for the designs. Thank You! 


.


This design is an Anniversary Card for two of my oldest friends who were married on Valentines day!
This little guy was the weed out of the vinyl and he landed on one of my cutting machines as an adornment.


I really wish blogger would let me line up my photos better.. ARGGGGHHH !


Monday, May 20, 2013

I decided to make a new color for the Silhouette Electronic Cutters! 
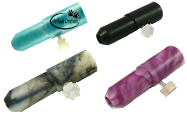
Whoo Hoo I was able to buy some Pink ABS in a very small quantity so supply is limited. I will not be molding this color again. I know some of you hate Pink but that is why I have my ever so popular Black and White Zebra.  So if you have been wanting to get one and Pink is your color get it now!!
Originally it was designed for Stampin' Up© Pens but now my favorite pens are Uniballs and Pentel Slicci's as well as Gelly Rolls by Sakura. The reason I do not make one for the Sharpie Fat tip is that with repeated use and pressure your tip will smash and get thick looking so by choice they are not the optimum pen for professional looking work. If you have embossing powder then a great pen to use is the Papermate Erasermate. Draw out your design, pull it out from the machine and pour embossing powder on the pen marks, heat with a heat tool...VIOLA a raised design. So many options for a professional looking design. Here are some examples from my friend Pam Connor : http://yorkiemomsblog.blogspot.com/

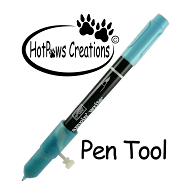
So you do not want to pay for a caligrapher for your wedding invites, how about just giving them the hand written touch by using your HotPaws Pen Tool. Like I did. This was actually a job I was hired for....Yes you can make money with your HotPaws Pen Tool! So Enjoy and Above all have FUN!!

Wednesday, February 13, 2013

Happy Valentines Day Steampunk Style!

 Happy Valentines Day Steampunk style! This has been needle felted and then I used Sizzix/Stampin' Up dies to cut the felt into the heart and wing shapes. The detail in the eye was so tiny to do! I have a tendency to make things very small! So hope everybody has a great Valentines Day!


Tuesday, February 12, 2013

Honeycomb Heart Using Stampin' Up Brushes

I have finally begun to craft again since I broke my arm last year. Here is a picture of the cute little Honeycomb Heart I made for my Valentine Tree. {Yes I have a 6 ft metal holiday tree for all holidays!} This Honeycomb method is fun to do and if you only want to do a half of one then glue each side to a card center and open up the card and viola an adorable Honeycomb insert card inside!  You have to cut out at least 15 hearts and glue them back to back in specific places to make the honeycomb. You can use any cutting machine like the Silhouette Cameo or Pazzles or the KnK Zing or Framelits by Sizzix or Spellbinders dies they will all work. My instructions came from the blog "Amazing Paper Grace" by Becca Feeken.
I did a lot of crafting last year but not all papercrafting. I will be posting these images soon too....fiber art, tole painting, machine knitting etc. I have been holding off because this blog was started for my papercrafting but I have branched out into so many different areas that they all tie in together. When people ask me what I do or what I am, I respond with I am a "Cross Crafter"  All my crafts cross over into each other.


Tuesday, June 5, 2012

Eagle Line Drawing

Had fun drawing this Eagle today in Adobe Illustrator. I was inspired by an internet teaching site so I drew my own! Used a Uniball Vision Elite pen in my HotPaws Pen Tool and reproduced this line drawing in a pen and ink style. This particular one was reproduced on a Silhouette Cameo Electronic Cutting machine....but could be reproduced on any cutting machine with my HotPaws Pen Tool.

Wednesday, December 14, 2011

HotPaws Pen Tool Video!!

I finally made a video about my pen tool and how easy it is to use! I just learned Adobe Premiere this semester and it was my final project!


Sunday, December 11, 2011

Silhouette Cameo Pen Tool!

I finally updated my Pen Tool page with a button for the Silhouette Cameo™...no more having to email me! This Pen Tool will work in the Silhouette Cameo™, Silhouette SD™, Craft Robo™ and the Wishblade™. The HotPaws© Pen Tool is molded by me out of a lightweight plastic instead of a heavier aluminium. The Silhouette™ machines are a very detail oriented machine and the heavier the tool you put into the clamp holder the more stress you can put on the clamp mechanism every time it raises and lowers for pen work. This Pen Tool will hold the same size pens as my original Pen Tool. The only difference is the outer diameter has been lathed down to fit these new machines perfectly! Some examples of the pens you can use are:
Stampin' Up© Pens, Uniball Signo™, Close To My Heart™, Zig™ Pens and Sharpie® Ultra Fine Tip Pens (Only Ultra Fine Tip).  And of course my newest favorite metallic pen the Pentel®  Slicci. Here is an example of the Slicci using The HotPaws© Pen Tool in the new Silhouette Cameo™.
Now the Slicci is a very tiny/skinny pen so I had to use one of the foamy pen grips I send with the Pen Tool for just these types of pens so it is centered in the holder. The writing in the center is a regular font. If you look really carefully you can see the gold pen outline I created just inside my cutting line. I created this medallion in Adobe Illustrator then saved it as an SVG file to import into my software. Speaking of software!!! Make The Cut now has a plug-in for the Cameo. I really like like the fact that Make The Cut can be used with so many different cutting machines...of which I have many..... Cutting machines are like Potato Chips.....You can't have just one!!

Thursday, August 25, 2011

Halloween Pumpkin Stampin' Up Style!!

 Did you know that a rubber stamp can be used in Polymer clay work? Well I did not until I made my first polymer clay creation. I was playing with some white polymer clay and decided to make a pumpkin, the the light bulb went on in my head and I found one of my retired Stampin' Up Halloween sets. The new set on pg. 26 of the SU catalog has a great new face that will work great for a this #122622 Jack Of All Trades. I then coated him with some Shimmer Paint and Smooch tinted orange and green. Some black Staz On in the mouth and eyes...then bake according to manufacturer's directions. For my first polymer clay creation I thought her came out really cute!


Another Halloween House Created with Chipboard

This cute little leaning house was created using my Pazzles Pro  machine. It was spray painted with orange & black spray paint with glitter sprinkled all over it. On the roof I glued a bunch of buttons like a gingerbread house would have. The "spider web" was created using  Beacon Advanced Craft Glue. I would slowly drizzle out the glue and pull on it to make a "string" across the front of the  house. The spider and bats were stamped on with Staz On ink using Stampin' Up rubber stamps.

Wednesday, August 24, 2011

Lets get into the Halloween Spirit....Boooooooooo!


Ok Lets get in the Halloween Spirit..Shall we!! Here is a Haunted House I did last year. Stampin' Up came up with this great house but did not release it time for my upline's meeting. So I just designed one myself with my Pazzles Pro in chipboard, almost identical to theirs so I could demonstrate the house to customers. For the shingles I did use the Sizzix Bigz Die #120893, with the Scallop portion. I used black spray paint with lots of black glitter. The bats were punched and glued to a wire I wrapped around the house and put in the chimney. Have fun and enjoy!


Monday, August 22, 2011

Node Editing: A quick overview video

 Now that I have my Camtasia set up on this computer, I decided to do a little video on editing nodes with the arc replace tool. Enjoy!


Cutting files for free ...not always a good quality = frustration and blame in the wrong place

I have been using cutting machines for many years now. I now have quite a few of these electronic monsters...yes I am addicted. Certain machines will cut certain files differently, some with better accuracy than others. Software has to do with this also because software is what is giving the machine the commands to cut. I started with a version from Signmax and have used Funtime/Pazzles, SCAL, &  MTC to name a few. I am now designing mostly in Adobe Illustrator and sending these files to my various cutting softwares. Klo can attest to the fact I am PICKY about my files!
Just a thought for newer people to ponder...
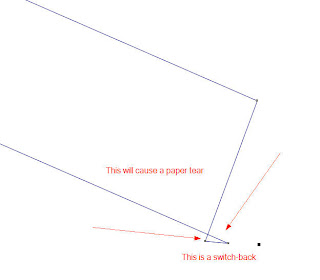
Are you getting your cutting files from websites for free? If you are getting these free files, look at them closely. These files may look pretty at first but once you magnify up on them...they are not such pretty files. Look closely and you will find loop-backs/switch-backs, points and corners too tight for the blade to make a good cut. Sometimes there will be double cutting lines or even an invisible cut line way out of your image that you do not even know is there. Also look at the amount of nodes. The more nodes, the more time it takes the software to calculate the cut. Then the machine will cut very slowly depending on the software you are using with what machine. I have included 2 pictures from a "FREE" download site and 2 random files I picked. Both of these free files had some major issues that I was able to see. After downloading many of this sites files, I found each one to have many problems that a newer user would not identify easily.  These issues would make a newer user frustrated with the quality of the piece that they cut... not the machine's fault but the file. I made sure that my images are not identifiable as to what "free" site they came from. I am not here to bash the person that creates them, only to make people aware that not all files are created equal. I look back at some of my files that I produced in my first year or two and I cringe at some of them and the problems I now see with them.
My point is that if you are new to this, use files from a well known source either purchased or designed by someone that knows what they are doing. LEARN your software and how to spot these "not so user-friendly" files. Start with simple images and learn your particular machine's cutting ability. Do not start with a complicated file that you downloaded for free. Free is just that, no guarantee unless you really like to be frustrated. Yes these free files cause lots of frustration. But then the blame gets shifted to the machine and the company that produced the machine...and then people write their frustration out bashing the machine or software...when all along it was that one free file you tried to cut...... Complicated intricate files should be cut with good quality paper and a sharp blade set "just right". Test cut an area first before you ruin that whole piece of nice paper. Do you live in a damp 40% plus humidity area? Then your paper may be harder to cut. I am a Stampin' Up demonstrator and our paper can be very temperamental to cut with humidity. Ok back to my point of free files....start with files from ex: Pazzles Craft Room or Scrap-Savvy or My Time Made Easy or many other trusted sites. Look close at their files, most of these files are excellent cutting files and will show you what a good file should be. Do not make a complicated file smaller to fit a small card if it was made for a bigger card or 12 x 12 layout.
Oh yes above all!!!! Do not wait till the last minute to learn your machine when you have to get something done... this will always end up in disaster and frustration...you know Murphy's law. Watch Klo's videos, Use Julie F.'s tutorials, go to You Tube and watch.
Disclaimer: No particular incident, person or site sparked this email, well Ok maybe one...hehe.  HAVE FUN!


Yes I am back posting again!

 Ok well I am back after 2 years of not posting. I have been crafting in many other areas as well as papercrafting, for example polymer clay, knitting, crocheting, digital arts. 2 years ago Stampin' Up made us sign this agreement not to promote/advertise other "Papercrafting" companies within our blogs. I do understand but.... I was not happy about this and neither were quite a few other demonstrators. Many, many wonderfully talented demonstrators quit. I almost did also because there are so many products out there to use and explore that sometimes putting them up on your blog is a must! I will be careful not to put names down of competitive products that we (SU) sell but if it something we do not direct market sell than I will be putting the name down of the product and where I got it. I do not use just one company's product, that would be very narrow minded in my mind since so many of Stampin' Up's products can be used in various other fields of crafting also. This being said if I use any product that I do not mention in my post; please post a comment or private email me and I will gladly tell you exactly where I purchased the product or who is the maker of the product.


Friday, October 30, 2009

My First Video Tutorial Yahoo! Funtime/Pazzles Software layers and cutting

I have always learned things better by seeing it done, not by reading about it. Someone asked a question on one of the Yahoo groups the other day about the Funtime/Pazzles Software and changing the layer order for cutting. I bit the bullet and downloaded Camtasia 30 day free trial. Great program! A bit pricey for some but I will be buying it! I made my first video last night to show a simple way of changing layers to get the layers in order for better cutting on the page. It is my first video so be kindd and excuse the abrupt ending. I had to cut the vdeo into two because You Tube only will take 10 minute videos....Bahhhh... I was 12 minutes and 31MB..Ok that was a big file.
So here is the link:


Down the line I hope to do other videos on Stampin' Up's new "My Digital Studio" and various other crafting endevours.

Wednesday, October 7, 2009

Cherry Cake Box

Another "Cake Box" But this one is one of my favorite retired Stampin Up papers of last year. One thing about dark papers when you use a "kiss cut" fold line your paper will show through it's core color. I am not too keen on that but.....

Cake Box with Stampin' Up Bride Speciality Paper


Here is a photo of my most recent project that I did for myself. Using Stampin' Up's newest Specialty Paper Bride. You can get templates all over the internet for a "Cake Box" so I am not posting one here. I did create a WPC file for my Pazzles to cut the multiple "Cake Boxes" that fit into an octagon.The rhinestones are heat set using a heat setting tool. The ribbon (5/8 Whisper White Organza) and flowers (Pretties kit) and glitter (Dazzling Diamonds) are all Stampin' Up products. You can do multiple tiers but on this one I only did one tier as an example. This would make a great bridal shower center piece then give every one a "piece" with little goodies in the boxes. If you find any typos that I did not catch....so sorry, I really did a good job busting my left ring finger Saturday night and typing with a finger brace really stinks! I even chipped the bone...it was that hard! Ouch!

Tuesday, September 8, 2009

Stampin' Up' software: MY DIGITAL STUDIO®

Well the new Stampin'Up digital software is finally out. It's called My Digital Studio®. If you have never used a digital scrapbooking program before, this will be a good beginning program for you. With a little help from the manual you will be producing your own printable scrapbook pieces in a matter of minutes with the included templates. Or put them together, upload and have a real book made through the Stampin' Up website. Here are a couple of pages I produced within a short period of time. This one I added 3 pictures that were automatically sized for me when I dragged and dropped them into the picture squares. I was able to use a bit of ribbon and added stitches to it.
This next one is a card size one that I was just playing around with. trying to blend different backgrounds. I used the scallop punch and filled it with color to put behind the little scrap of paper. I put a tag punch on it with another tag punch over it with a brad. Add some ribbon and your done with your digital card!